NOTD: Rimmel Lycra Pro in Show Off

2 comments


Hey guys! 
So recently I've been loving the colour pink...and all things girly and princess-y. Don't ask me why because I can't put my finger on it! All of a sudden I just wanna be a princess! 

I bought this nail varnish for my mum originally but she never even wears nail varnish so I stole it! 

This is Rimmel London's Lycra Pro Professional Finish nail varnish in 297 Show Off and I got it from Tesco for £5.19 a few years ago so I'm not sure how much it costs now but I'm sure they'll still have it!

What do you think of this nail polish? let me know!

                                                                       Alicia x 
     Twitter | Bloglovin' | Tumblr

REVIEW | MaxFactor Face Finity All Day Flawless 3 in 1 Foundation in 45 Warm Almond

Leave a Comment


Hey guys!

So recently I've had a bit of a bad time with foundation as I bought Revlon Nearly Naked foundation in Shell 130 (you can read my review >here<) and if you've seen my review you'll see it didn't really get on with my skin which was a shame because it was such lovely coverage but it just broke me out and literally just sat on top of my skin, I just couldn't work with it no matter how much I tried to love it!

However, I tried MaxFactor's Face Finity a few months ago when it was first released and it was on offer, it was £8.99 when I originally bought it. I loved it no end and without out a doubt it was to become my staple foundation. I then made the choice of buying Revlon Nearly Naked foundation when my Face Finity ran out. After realising I wasn't going to get along with the foundation I couldn't wait to get my hands back on it. It's the only high street foundation that has agreed with me.

It claims to have a 3 in 1 property as a foundation meaning that it has a built in primer, concealer and foundation. As you can see from the swatch it is sheer but build-able. I have combination skin so my nose area and chin get quite oily sometimes and this stays put all day through any weather! It covers spots fantastically and I definitely think it lives up to its 3 in 1 promise! I used this foundation with another primer also, Rimmel's Stay Matte Primer, and it worked well with that too. I have use this foundation without a primer and it works just as well but I personally prefer it with primer to create a barrier between the skin and the foundation and to get as long as I can from the foundation in terms of wear!

The colour of the foundation is very true to swatch/colour but I would recommend trying the foundation out in store just to see if the colour matches. Even though I knew that this foundation would suit my skin, due to previous purchases, I was so worried I would turn orange from it after the nightmare I had with Nearly Naked foundation that I insisted on going into the store make-up free and putting it on my face, I then walked around town for a bit looking in other shops. I did this to see whether or not the foundation would oxidise over a few hours. I don't know why but I felt like I couldn't trust any foundation anymore as sad as that sounds. I developed trust issues after being let down by Revlon! This obviously isn't Revlon's fault, Nearly Naked foundation could work perfectly for you and your skin tone/type but it didn't agree with me or my skin which was a super shame! I have read reviews from Estee @ Essiebutton and Anna from ViviannaDoesMakeup and they loved it so it's worth a try!

Anyway I returned to superdrug looked in the little cosmetics mirror on the Max Factor stand to see that my skin still looked flawless 3 hours after applying so I bought it! I actually don't have a bad word to say about this foundation, other that the pump isn't as long as the bottle so you get product left at the bottom. I'm currently draining the remains of my last bottle to mix in with my new one! Waste not want not!

This product retails at £11.99 in Boots and Superdrug.

Have you tried this foundation? Let me know!

                                                Alicia x 


Dealing with a delicate issue - Greasy hair. TRESemme Instant Refresh Dry Shampoo for normal to oily hair.

4 comments

Hey guys!

So I tend to wash my hair every other day. Now there are days where I really can't be bothered to wash my hair so I go maybe 4 or 5 days without washing it (I shower, I just don't wash my hair) this is because my hair is so thick it takes about and half hour to dry and around 45mins/1 hour to straighten it and even longer to let it dry naturally, probably around the 3 hour mark for that. So dry shampoo's play an important part of my hair care routine.

I used to swear by Batiste because 1) They're affordable 2) They smell gorgeous and 3) They work. The only think that really annoyed me is how long it took me to get all the "dust" residue it left to completely sink in to my hair. I was left looking like someone who was either graying or trying to look like Morticia Addams. I also wasn't mad about how it left my hair feeling stiff/stuck together I know I may sound like I'm being fussy, but I think I have a right to...I am paying for the stuff!

So I began the search for a new dry shampoo product! One that ticked all the boxes - the boxes being - Left my hair feeling and looking fresh, smells nice, doesn't leave me looking gray, doesn't leave my fingers full of powder when I run my fingers through my hair and most importantly, lets me run my fingers through my hair! Thats when I fell upon a YouTube video (by Zozeebo/Zoe Sugg of whom i'm sure you're all familiar!) So I went down to Boots and picked this up!

My first thoughts were, it will probably do the same as Bastiste but I may aswell give it a go. I was wrong, much to my surpise. When you apply this dry shampoo it smells great, it doesn't leave a gray residue on your hair AND you can run your fingers through your hair! YAY!! I've found my holy grail high street dry shampoo! and at  £4.99 a little more expensive than Bastiste, you can't go wrong for what it does! Now I do admit Bastiste has a range of smells and it does work but this is so much more efficient for those days you simply don't have time to  massage your roots for 10 minutes waiting for the gray dust to disappear and with Batiste I also find that the smells disappears after about half an hour! 

This sounds like I'm slating Batiste, I'm not, I love the brand! Simply trying to say if you have the extra £1 this is the definite go to for me but if not then Bastiste is a great alternative!

Have you tried this Dry Shampoo? Let me know! :)

Alicia x
Twitter | Bloglovin' | Tumblr

Alicia's Declassified Festival Survival Guide Part 3: The Finale!

2 comments

Alicia's Top 5 (Fun) Festival Rules:
  1. Take A LOT of pictures!
  2. Get drunk (responsibly of course ;) )
  3. Meet lots of new people & Stay up till all hours of the night.
  4. If you don't want to lose it/can't live without it. Don't take it.
  5. Last but not least, have fun! :)


Alicia's Declassified Festival Survival Guide: Summary
  • Remember to pack the essentials - When doing this think about stuff that you use everyday. Toothbrush, Hair brush, toilet roll, a fork. Things like that! You'll be surprised at how much you realise that you needs.
  • Festival clothing - Festivals clothes are a lot different to every day clothes. Think about it, would you walk about college in short short and a crop top? It wouldn't be appropiate. There's a time and a place for everything and a festival is a place for wearing summer/hippy/crazy clothes and no one will turn a blind eye so experiment with it!
  • Don't wear fake tan OR high heels - I can't stress this enough because no matter how appropriate you think it may be. Tan goes patchy without proper maintenance and without a shower, you can't exfoliate and it will cling to your dry skin, especially if the weather is hot! Also, heels is just a no and I know most of you will read this and think "Is she stupid who would wear heels in the grass?!" You'd be surprised what people wear! Trust me!
  • Stay Safe - Don't get drunk and wander off alone festivals  have dodgy people around just like anywhere else. You'd be even more at risk due to the high amounts of people, it'd be extremely hard for someone to look for you+ find you without knowing where you've gone! Always stay with friends and plan a place to meet if you lose anyone. I'd advice taking a cheap £10 phone instead of an iPhone or something too. (No one will steal that!) So if you do get separated you can phone someone. If a friend is drunk, don't leave them alone! You can never be too careful :)
  • Have fun! - I hope I haven't scared you off, festivals are wonderful places if you're sensible and plan everything correctly! 

So I hope you enjoyed this advice :) Obviously I'm taking it from experience! Hope you enjoy your festivals!! :D

Alicia x
Twitter | Bloglovin' | Tumblr

Wednesday Post | Pet Adventures #4

Leave a Comment

Introducing!


Hey guys!
Recently I've finished uni and just been working and doing nothing. We had some bad news the other week when our cat went missing so we decided to get a new one as the house felt empty and our other cat was mourning the loss of his bro! This is Ollie my kitten and he's about 11 weeks old now, he's a little monster!

Keep up to date with what he gets up to in the "Pet Advetures" tab

Alicia x
Twitter | Bloglovin' | Tumblr

Tanning Routine | Using Garnier Summer Body, St Moriz and Expose

1 comment


Hey guys!

First off I apologise for the minging bottles haha, I tend to grab the bottles with my grubby fake tan hands  then forget to wipe them down, suppose I should of for the purpose of this post but oh well! Moving on...

I'm just going to run through my tanning routine. If you, like me, don't tan easily but want to be a little more tanned during these summer months whilst waiting and hoping for the sun to shine upon us and golden our skin, then this post is for you! I don't want to enter summer looking like a milk bottle whilst all the other girls my age have been prepping for this the whole winter by using sunbeds! I am a sunbed-aphobe. They make me claustrophobic and if you've seen Final Destination you'll know why! I do like to go on them but I don't go on them a lot. A) Because I'm skint and B) I fear dying on them (not that drastic but you get what I mean.) So my alternative is fake tan! Yes it is messy and sometime does go patchy but with the right care I can be a god send!

First off I exfoliate my skin head to toe. To do this I use my exfoliating gloves which I got from Home Bargains, (they were only 35p!!) AND they are light pink with little hot pink hearts on them, how cute? Anyway, I use these gloves and my Soap & Glory Sugar Crush body wash to thoroughly exfoliate my body and then when I get out of the bath/shower I pat my skin dry and use the Garnier Summer Body Gradual Tanner for Lightly Sun-kissed Skin (Step. 1.) I use this all over my body and let it sink in. 

I then wait over night for this tan to develop because if there is one thing I have learnt it's not to moisturise and then fake tan straight afterwards as the tan will not properly sink in, this is why I have a gradual tanner, I don't want to fake tan straight away as the tan will cling to dry skin, so by using a moisturising fake tanner (gradual tan) I get moisture for the dry skin but also a tan that looks even. While I wait for the tan to develop I also have to decide whether or not I want a deeper tan. If I'm going on a night out or doing something where a lot of flesh will be on show (If it's sunny or going to the beach, but not in the water) then i'll put an extra layer of actual fake tan on. The fake tanners (Step. 2) I use are quite cheap ones. The Expose fake tan is something like 85p in Home Bargains which is insane for the tan you get from it! My other favourite is St. Moriz I also have this in a spray version, but I keep one at home and one in my uni flat so the spray is back in my flat!

I apply the fake tan the day after I've applied the gradual tanner and then I wait around 6-8 hours for it to develop. I usually start doing this a few days before I'm due to go on an night out so that IF I do find I've gone patchy or missed a bit then I can correct it and have enough time for it to develop/show up on my skin! 

There we have it! That's my routine :). Nothing to it really it;s quote simple, the thing with me was were to start and which products to use but I guess after you've tried and tested you find the ones that suit you best!

What're your favourite fake tanners? Let me know! :)

Alicia x
Twitter | Bloglovin' | Tumblr

REVIEW: Tangle Teezer - The brush to end all brushes.

3 comments


Hey guys!

Now I know everyone woman and her dog has this brush, but I thought I'd write this review for those, the minority, readers who don't!

Let me start of by saying I was a serious skeptic  despite the rave reviews this product has received  that this would actually work as well as everyone was saying. I thought, yeah ok maybe it does detangle you're hair but it will not detangle the knots that are so bad you have to cut out. I was wrong.

My hair was really really dry when I bought this brush and dry hair gets into unimaginable knots so I needed a decent brush that wasn't going to rag my hair senseless and leave me bald. My hair was so dry due to me just having bleached it and I also hadn't got round to buying a deep treatment masque to put on it, as of yet, as i;m on a student budget. So I thought I'd give this a go and see if it made my hair more manageable and shiny like the reviews and the brush itself (well the brush makers) claim it will do. I handed over my £10.49, reluctantly - so reluctant to had it over that I even remember the exact price. Wow.

My first impressions were "I heard it struggle through a knot  I've wasted my money." But after a that I realised I was obviously expecting too much if I was honestly thinking it was going to glide through my hair. My hair when unbrushed is like a tumbleweed in resemblance, circular on top of my head, all tangled up and trying to get away from me so obviously I couldn't expect it to glide through without making a sound. The only way I could actually realise the difference was when switching back to my old brush. The pain wasn't even real.  don't know whether I'd become sensitive to the pain or whether I was just used to it and built up a resistance to it before I discovered my beloved Tangle Teezer.

Hopefully, you get what I'm getting at here anyway. I'm completely rambling on. This brush is amazing and it really does just glide through hair, with the occasional hiccup on the slightly heftier knots but with ease none the less. If your hair is like wire wool and you can't get a normal brush near it then this is the brush for you. Or even if you just want your hair to grow a bit more, this brush will help as it'll stop your hair from snapping or being stretched when being brushed. This brush is very gentle on the hair and I highly recommend it. For it's price, it works wonders! 

Tangle Teezers retail at £10.49 up to £13.49 in Boots and online.

Do you have a Tangle Teezer? What do you think?

Alicia x
Twitter | Bloglovin' | Tumblr

NOTD: American Apparel Sheer Nail Lacquer in Redondo Beach

1 comment

Hey guys! 

Sorry for the dark picture, bad lighting in my house but the thumb and pointing finger are pretty true to colour!

I love this nail lacquer, I got it as a free gift when I bought my disco pants from AA. It retails at £9 and comes in 3 other neon colours! They're really long wearing and after 2/3 coats they're really pigmented and not to mention shiny!

I'm so glad I chose this colour as my free gift!

Do you have any American Apparel polishes? Let me know! :)

Alicia x
Twitter | Bloglovin' | Tumblr

HOW TO: Keep bleached hair healthy using TRESemme, Hask, Boots, Charles Worthington, L'oreal and Andrew Barton.

2 comments

Shiny Soft Hair!


Hey guys!
So my hair is quite overly processed due to my obsession with changing it's colour every so often. Even if i'm not changing my colour I'm dying the roots back in and what not!

These are some of the treatments, masks and oils that I use to keep my hair feeling soft, looking thick and being generally healthy!

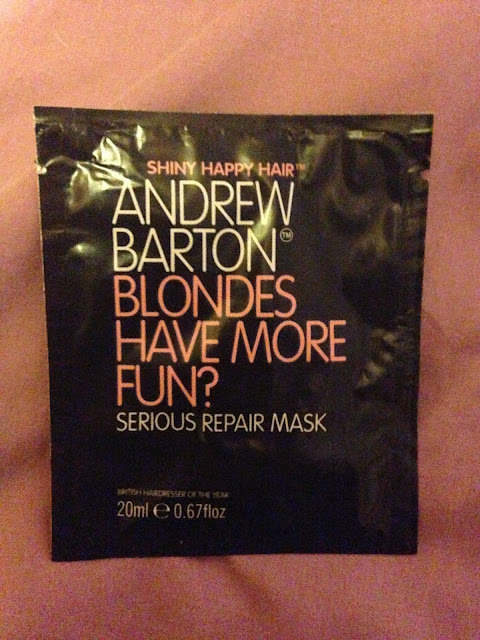
Andrew Barton's Blonde's Have More Fun? Serious Repair Mask - £1, ASDA
I use this every now and again to give my hair an extra boost. It being a serious repair mask i use it when my hair feels like straw basically and due to the bleaching it does tend to get straw-y after a few days of not washing. (I think i need to change to a non-spray dry shampoo as well. The alcohol in the tin doesn't do anything for my brittle hair!) This really livens up my hair and makes it super soft and shiny.

Hask Macadamia Oil Healing Shine Treatment*
This little tube was sent to be my the lovely people from Hask Hair. I reviewed their other hair treatment, which is available in Primark for £2.50, and they're just little shots of hair oil such as, Argan, Morrocan and Macadamia that are just fantastic tubes of fabulousness! They are exactly what my hair needs on those down days when your hair just isn't feeling luscious enough! You can use it on wet or dry hair (only on the ends, it's too oily for the roots) and it really helps repair them and prevent split ends. Obviously it can't repair ends that are already split, the only thing you can do for them is chop them!

Boots Coconut & Almond Leave In Conditioner - £1.39, Boots
After researching what products I'd need to keep my (then) ombre'd hair in good condition I realised i would need a leave in conditioner and this one had rave reviews on the Boots website and it being so cheap I decided to buy it. It's lasted me ages, it smells delicious and it kept my hair in really good condition! (In addition to looking after it, trimming it etc!)

L'Oreal Elvive Anti-Frizz Serum - £5.99, Boots
I use this on the ends of my hair when they feel extra brittle, I don't really use it as an anti-frizz serum as I tend to straighten my hair anyway so the frizz is mostly tamed after that. It gives the tips of my hair an extra bit of life. This product was my holy grail product last year but since trying to discover other things its kinda been pushed to the back of my stash, I need to rediscover it!

Tresemme Keratin Smooth Deep Treatment Masque - £5.50, Boots
I cannot stress enough how fab this product is. I bleached my hair 3 times within 2 months and after the third time, I could feel my hair starting to break, I soaked my hair in warm water, slapped this on for 15 minutes, washed off, applied the Keratin Smooth heat protective spray and after I'd finish styling (heat and all!!!) My hair felt like brand new! I was so shocked, it's a definite re-re-re-repurchase for me!

Charles Worthington Mineral Hair Rescue Rejuevenating Masque - £5.49, Boots
I wrote a review >here< about this product giving the whole sorry story of how it was brought into my life. I use this mainly when my hair needs a bit of a treat but not a full on repair. It can do the 'serious repair' trick but I feel my Tresemme masque has that down to a tea so this one is nice for a change up of products!

Tresemme Split Remedy & Platinum Strength Leave-in Treatments - £4.99 each, Boots
These treatments are after shower&bath&hair wash treatments. I use them every single time I've washed my hair. They seriously make a difference to the feel of my hair. I've really noticed a difference in length as well since I've been using them. I would definitely recommend these products! 

So these are the products I use on my hair! Have you used any of these producst? What do you think? Let me know :)

Alicia x
Twitter | Bloglovin' | Tumblr

My Top 10 Lips Products

6 comments


Lip Products (L-R)
  • Rimmel Apocalips - Big Bang
  • Rimmel Apocalips - Apocaliptic
  • Rimmel Apocalops - Celestial
  • MAC RiRi Woo
  • MAC Ruby Woo
  • Revlon Lip Butter - Strawberry Shortcake
  • Topshop Lipstick - Tease
  • Topshop Lipstick - All About Me
  • Rimmel Kate Moss Lasting Finish Lipstick - 04
  • Rimmel Kate Moss Matte Lipstick - 101

Rimmel Products

Apocolips

Big Bang, Apocaliptic, Celestial - These lip lacquers are extremely pigmented and easy to apply, even without applying lip liner first and they stay on for ages and act as a lip stain onces the gloss has all rubbed off. They're also really inexpensive and the packaging is pretty! Read my review >Here<

Kate Moss 
101, 04 - The Kate Moss range is one that took the beauty world by storm and I didn't really catch onto it for a while. When I did invest I bought a deep red shade (111) a nude baby pink (101) and a very deep purple (206) They leave your lips feeling moisturised after you've used them and they are very pigmented!

MAC Products
Ruby Woo & RiRi Woo - These two lipsticks have made their mark in their own way but each are equally brilliant and equally different. They both are matte finish lipsticks but RiRi Woo applies much smoother than Ruby.My advice would be to apply with a lip brush! I've done a review on both of these lipsticks/how they're different post which you can see >here< Another plus is that they smell delicious!

Topshop Products
All About Me & Tease - The thing I love about Topshop lipsticks is that it stays put for so long, they're reasonably priced and they come in fab little boxes, everything needs that is needed to make a lipstick basically perfect in my eyes, Topshop have done! :) read my reviews > Here for Tease and Here for All About Me <

Revlon Products
Strawberry Shortcake - Revlon lip butters are a god send, they're like lip balm, in the form of a lipstick. This colour is perfect for everyday, around the house when you wanna feel like a glam 50s housewife or even a night out! It works all ways and that's what I love about it!

So they we have it! My top 10 lip products/lip sticks! Do you have any of these? Link me to your favourites posts! :) Remember to follow me on Bloglovin' :)

Alicia x
Twitter | Bloglovin' | Tumblr

Face of the Day #3

Leave a Comment


Products Used

Face
  • Rimmel Stay Matte Primer
  • Revlon Nearly Naked Foundation in 130 Shell
  • Collection 2000 Lasting Perfection Concealer in Fair
  • Rimmel Wake Me Up Instant Radiance in Rose
  • Rimmel Stay Matte Powder in Peachy Glow
  • Bourjois Delice Du Poudre Bronzer in 52
  • Rimmel Blush in Pink Rose
Eyes
  • Rimmel Exaggerate Undercover Eyeshadow Primer
  • MUA Eyeshadow Palette in Undress
  • Soap&Glory Super Cat Eyeliner
  • Rimmel Eyeliner in Pure White
  • Benefit's They're Real! Mascara
Eyebrows
  • Rimmel Eyebrow Pencil in Hazel
  • MUA Pro-Brow kit
Hey Guys!

Ok, so this is my 2nd face of the day post, I know I used a lot of products in this but I hadn't got properly dressed in 3 or 4 days and wanted to make an effort! I've done reviews on some of these items and I'll post links to them below!

What do you think of this face of the day? Do you use any of these products? Let me know!

Alicia x
Twitter | Bloglovin' | Tumblr


REVIEW: Benefit "They're Real!" Mascara

Leave a Comment

 Before:

 After:

Hey guys!

So I bought this months copy of ELLE mag for the same reason as many other people, the free Benefit They're Real mascara sample. I've wanted it for a while but I just can't justify spending £9.50-£19.50 on a mascara, even if it is really good I feel other mascaras can do the same job! 

Anyway I bought ELLE, got my sample sized mascara and was super happy. I have taken pictures of my lashes and as you can see, before the mascara is applied, they're light blonde and basically non-existant and afterwards they're very pigmented and have increased in length! I was very pleased with this and was pleased with the mascara so far.

I wore it throughout the day half expecting it to flake off like my other mascars or to go gooey in the heat, it did not. It stayed put all day, being extremely pigmented and making my lashes lengthen in size.

Overall I am very pleased with this mascara! I don't think I'd pay £9.50 for the size it is though, I may consider buying the £19.50 size, simply due to it's size. But only if i had money to burn!

What do you think of this mascara? Let me know!

Alicia x
Twitter | Bloglovin' | Tumblr

Alicia's Declassified Festival Survival Guide: Part Two - Outfit Do's and Don'ts/My ultimate festival wear for days 1-4

Leave a Comment

*Again, I'd like to say I'm not an expert and I know this I'm not trying to come across that way I'm just offering advice for the festival season, it's just common sense/comfortable-ness that i'm keeping in mind and sharing knowledge of previous festivals :)*


Do's
  • Pack for all weather scenarios - Don't want to be stuck in shorts, t-shirt and sunnies if its pouring down!
  • Pack enough underwear - nothing worse than focusing on everything else and forgetting to pack them! Or in case of rain and you need to chance
  • Take a Mac or rain coat
  • Take warm clothes for the night, it gets colddddd. Especially on the floor!
  • experiment with clothes, festivals are places of freedom!

Don'ts
  • Don't wear instant fake tan, I've seen this happen, it then rained and it's not pretty. Think paint dripping.
  • Don't wear jeans - it's highly uncomfortable!
  • Don't wear heels or anything of the sort. It's just common sense...
  • Don't forget suncream!!!


I've assembled four outfits that I would wear and probably will wear this festival season! Here they are :)

Day One: Travelling there I just want to be comfortable so this is the outfit I chose.

Day 2: Festival is starting up, gettin my festival wear out!


Day 3: Festival wear


Day 4: Going home, but don't want to leave - still in festival wear.


So this is my little look book of sorts of festival fashion looks I'll be hoping to wear at a festival!

And that concludes part two of this series of posts!


What're you planning to wear?? :)


Alicia x
Twitter | Bloglovin' | Tumblr

Social Media Handles for 'Aliciajadex'

Leave a Comment

Just writing this post to make my other social media outlets for this blog a little more obvious! Also because Google Reader wont be available from July 1st so to continue getting regular blog updates and posts follow my Facebook, Twitter and Bloglovin'!


Alicia x
Twitter | Bloglovin' | Facebook

Correcting badly dyed hair, with BBlonde.

1 comment

Jerome Russell's BBlonde Hair Lightening Kit in Medium to Dark Brown Hair*


The packet includes:

A set of  gloves, a cap, a set of instructions
 A bottle of 30 to 40 vol cream peroxide, a packet of 30 to 40 vol powder bleach a packet of post treatment conditioning shampoo 
 A mixing tray and an applicator brush. 
You will also need: a bin bag - to use as a protective cape, a pair of scissors - to open the sachets, a tub of petroleum jelly - to put around the outline of your hair to prevent the dye from getting onto your skin, hair clips - to section the hair and an old t-shirt - to wear under the bin bag to prevent ruining your nice clothes!
How to go about mixing the solutions and applying: pour the bottle of cream peroxide into the plastic mixing tray with the sachet of powder bleach and mix them together until there are no lumps left in the mixture.  

Apply the mixture to the hair using the applicator brush and remember to wear the gloves! I used this brush to apply the mixture to my roots as I found it too time consuming to use the brush on the lengths of my hair due to it's thickness.

If you have dyed or bleached you hair before and your roots have grown out, now showing your natural hair colour, then apply the bleach all over the lengths first. I'm not sure on the application times but it does say on the instructions :)

When I had put the mixture all over my hair (except the roots) I put the cap provided in the packet on my hair and left it for 20 minutes, then i applied the mixture to my roots and put the cap on for a further 20 minutes. I didn't want to go bleach blonde so I kept the bleach on for 40 out of the 20-60 recommended minutes and checking my hair every ten minutes to see what colour it was going. I also put tinfoil on parts of my hair to stop the dye from drying out.

When the 40 minutes was up I washed the mixture of with warm water and applied the conditioning shampoo, I lathered it in for 30 seconds then rinsed it with warm water.
After:

 As you can see the bleach has lightened my hair and evened out the tone! My hair before was my own fault not the previous bleach I used as I left the bleach on the whole head for 30 minutes even thought my roots had grown through!

Overall I'm very happy with the results and I would definitely purchase it when I need to lighten my hair again. The colour pay off was just what I wanted as I was thinking of lightening my hair again anyway to even out the tone and it didn't totally wreck my hair or dry it out like bleaches usually do.

I did receive 2 boxes of the bleach which I applied 1 and a half to my hair! My hair is of just below shoulder length and quite thick! 

This hair lightening mixture is retailing at around £5-6 in Boots.

What do you think of this brand? Have you ever used BBlonde? Let me know! :)

Alicia x 

Twitter | Bloglovin' | Tumblr


*PR Sample
Next PostNewer Posts Previous PostOlder Posts Home
Related Posts Plugin for WordPress, Blogger...
BLOGGER TEMPLATE BY pipdig